

Introduction
After registering the domain and linking it to my hosting provider's server, Linode, we can now proceed and finish the settings on my Linode server.
We are going to transfer the management of the domain records from Namecheap, where we bought the domain, to Linode.
Transfer domain record management from registrar to cloud hosting Linode
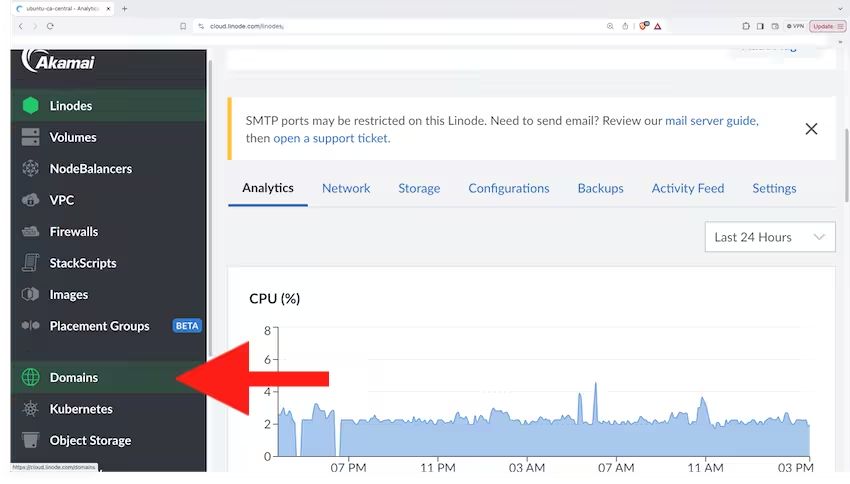
To do so, first we click on the "Domains" on the left nav bar:
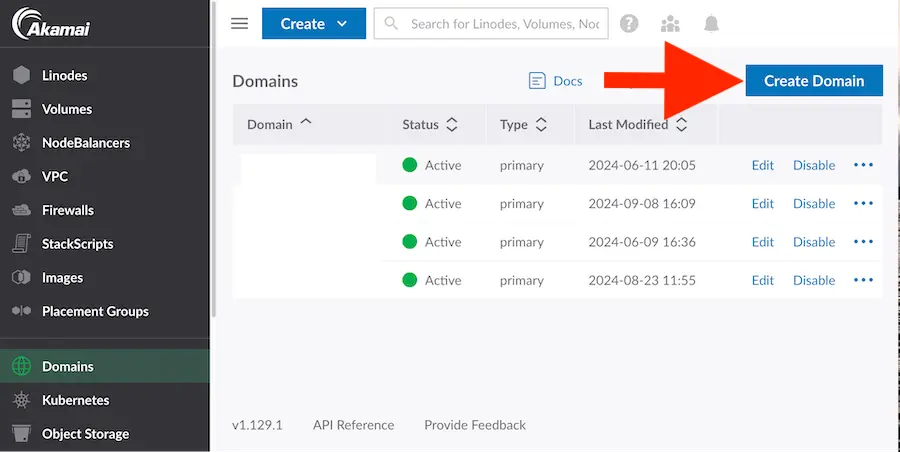
Then, on the top right, click "Create Domain".
We then filled out the form with the new domain name we had just bought "drywallkingston.com".
We added an associated email that we used when we purchased the domain from Namecheap.
If you want to learn how to buy a domain off Namecheap and how to associate the Linode server hosting with the new domain, you can read this article: Rank And Rent Part 3 Buying Domain From Namecheap And Linode Hosting.
Under the "Insert Default Records," make sure to select the "Insert default records from one of my Linodes."
Then, select the "Linode" on which you want the domain to be running.

Once the form is filled, just click "Create Domain".
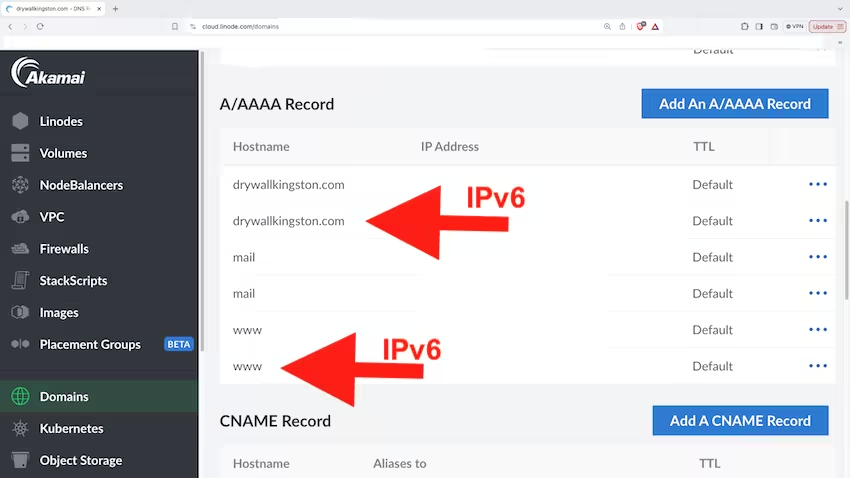
On the page allowing access to editing the domain's records, please ensure the IPv6 record is set and present under the A/AAAA Record in its standard and www version.
Serve a new website from a setup (i.e. pre-setup, already set up, running) NGINX web server
Now that our domain is set up, we can SSH into our server instance and set up the NGINX web server to serve a new node and express process under PM2.
If you did not understand the phrase above, you can read more on the topic (i.e. Node.JS, express.js, web servers, NGINX) in this blog article: Projet Node JS. Translate the article into English before reading it using your browser settings.
To understand this tutorial from where I am operating, these are all the things I have already done on the server instance:
- OS: Ubuntu 20.04
- I have a non-root user with sudo privileges and an active firewall.
- A domain name pointed at your hosting server’s.
- Nginx installed on Ubuntu 20.04
- Node.JS installed
- PM2 installed
- certbot python3-certbot-nginx installed
- HTTPS firewall setup
- MySQL is installed on the server with a database created
You can read more on how to set everything from scratch from these 2 blog articles:
- How To Set Up a Node.js Application for Production on Ubuntu 20.04, (If you are already setup with the pre-requisites then just follow the tutorial from this point: Step 4 — Setting Up Nginx as a Reverse Proxy Server)
- How To Secure Nginx with Let's Encrypt on Ubuntu 20.04, (If you are already setup with the pre-requisites then just follow the tutorial from this point: Step 4 — Obtaining an SSL Certificate)
- and all the tutorial articles linked within those articles.
All I am required to do to serve my new website "drywallkingston.com," is to:
- Clone in the Node.js and express.js code from a remote repo hosted on GitHub.
- Setting Up Nginx as a Reverse Proxy Server through a new "server block"
- Generate new letsencrypt certificates to serve the website under the HTTPS protocol
- Edit the website's config file to redirect HTTP and serve the HTTPS version of the website.
- Ensure the Node.js and express.js instance is running and managed under PM2.
Step 1: Clone the Node.JS and Express.js project from GitHub and run the app under PM2
We need the node express project running on localhost from our server.
Let's say we created a local project from our home computer. Follow this tutorial (Projet Node JS) to create a node express instance from barebone template code.
Let's say we edited the barebone node express home project to be capable of serving the "dryallkingston" website.
The "dryallkingston" website project has some particularities to keep in mind from its barebone template state:
- A GitHub Actions CI/CD process script
- .gitignore files and folders
- A .env file with variables in it and set up on the development and production environment
- A bunch of dependencies specified in the package.json file
- Github actions secret variables are set up so the Github action CI/CD process script can work.
- A connection to a local and remote MySQL database is specified.
- A pre-commit that generates the dump file from the local database and adds it to the commit.
- A robot.txt file
The CI/CD process does the following.
- Deletes the package-lock.json, node_modules, and sequelize models
- Pulls the fresh code out of the GitHub origin that was just pushed.
- Re-install all the needed dependencies.
- Loads the dump file and edits (i.e. from the local home computer) onto the remote database (i.e. local to remote migration)
- Generation of new models from the refreshed database schema and data.
- PM2 restart of the node express instance.
We then push the code onto a GitHub repository.
From the Linode server that we SSH to, we can then clone this repository using the flowing command:
git clone https://github.com/ZouhirBensm/[name].git
Once the project is cloned and .env prod variables are set up, we can now run the localhost instance on the server under PM2.
pm2 start drywallkingston.js
Step 2: Setting Up Nginx as a Reverse Proxy Server
Under
/etc/nginx/sites-available/
On the server, we can create the website file "server block." To do so, run this:
sudo nano /etc/nginx/sites-available/[domain].com
sudo ln -s /etc/nginx/sites-available/[domain].com /etc/nginx/sites-enabled
You can place this temporary content within this file to serve the website on the Internet under HTTP.
server {
listen 80;
listen [::]:80;
server_name your_domain.com www.your_domain.com;
location / {
proxy_pass http://localhost:[port];
proxy_http_version 1.1;
proxy_set_header Upgrade $http_upgrade;
proxy_set_header Connection 'upgrade';
proxy_set_header Host $host;
proxy_cache_bypass $http_upgrade;
}
# Optional: Serve static files
location /static/ {
alias /path/to/static/files/;
}
}
When we generate the letsencrypt certificates, this file will automatically change so that the NGINX web server can serve the website over HTTPS.
Upon generating the certificates, we need to ensure the config file specifies serving the website under an IPv6 address; otherwise, the generation of the letsencrypt certificate will not work for the new website. With this temporary content, IPv6 is specified (see line below), so we are set to proceed.
listen [::]:80;
Step 3: Generate the letsencrypt certificates, adjust the server block file, re-run the PM2 instance
Now that the website is hosted over HTTP, we can generate the certificates on the server to enable the server to serve the website pages over HTTPS.
To do so, run the command below:
sudo certbot -v --nginx -d [domain].com 1 -d www.[domain].com
After your certifications are generated for the new domain, we can check whether the certificates can auto-renew before their expiry date.
To check if the auto-renew process is set up, run the command below:
sudo systemctl status snap.certbot.renew.timer
To test the renewal process, you can do a dry run with certbot:
sudo certbot renew --dry-run
You can check this query and the answers on the letsencrypt : community.letsencrypt.org for more troubleshooting information.
At this point, the website should be all set and live online.
Next steps
Thanks for reading this blog from the series Building My First Rank And Rent Asset In Public
The next piece of this series can be accessed here: Rank and Rent Part 7 Writing the Website's SEO Blogs, Services, and Other Pages.
Appendice
In case you are wondering how the final config file should look like, you can have a look below:
server {
if ($host = www.[domain].com) {
return 301 https://$host$request_uri;
} # managed by Certbot
if ($host = [domain].com) {
return 301 https://$host$request_uri;
} # managed by Certbot
listen [port1];
listen [::]:[port1];
server_name [domain].com www.[domain].com;
return 404; # managed by Certbot
}
server {
root /var/www/[domain].com/html;
index index.html index.htm index.nginx-debian.html;
server_name [domain].com www.[domain].com;
location / {
proxy_pass http://localhost:[port];
proxy_http_version 1.1;
proxy_set_header Upgrade $http_upgrade;
proxy_set_header Connection 'upgrade';
proxy_set_header Host $host;
proxy_cache_bypass $http_upgrade;
}
listen [::]:[port2] ssl; # managed by Certbot
listen [port2] ssl; # managed by Certbot
ssl_certificate /etc/1/letsencrypt/live/[domain].com/fullchain.pem; # managed by Certbot
ssl_certificate_key /etc/1/letsencrypt/live/[domain].com/privkey.pem; # managed by Certbot
include /etc/1/letsencrypt/options-ssl-nginx.conf; # managed by Certbot
ssl_dhparam /etc/1/letsencrypt/ssl-dhparams.pem; # managed by Certbot
}